- Catalogues
- Warm-On
- Manuel d'installation du thermostat TP750
- Société
- Produits
- Catalogues
- News & Trends
- Salons
Manuel d'installation du thermostat TP750
1 /24Pages

Manuel d'installation du thermostat TP750
1 /24Pages
Extraits du catalogue
BENUTZERHANDBUCH INSTRUCTIONS FOR USE AND INSTALLATION INSTRUCTIONS D'INSTALLATION E
Ouvrir le catalogue en page 1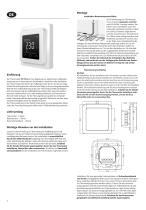
Einführung Der Thermostat TP 750 dient zur Regelung von elektrischen Fußbodenheizsystemen in Innenräumen (Heizmatten, Heizfolien oder Heizkabel). Der Thermostat hält die für den Fußboden oder die für den Raum eingestellte Wunschtemperatur aufrecht und trägt zu einem energiesparenden Betrieb Ihrer Fußbodenheizung bei. Der Thermostat bietet die Möglichkeit einer Steuerung des Fußbodenheizsystems über zwei Temperatursensoren: Bodensensor (im Lieferumfang enthalten) und Raumsensor (fest im Gerät verbaut). Für die Heizungssteuerung können entweder beide Temperaturfühler gleichzeitig ausgewählt (aktiviert)...
Ouvrir le catalogue en page 2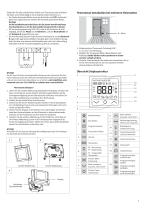
Verbinden Sie aile erforderlichen Kabel zum Thermostat und schlieften Sie diese vorschriftsmâftig an die entsprechenden Klemmen an. • Der Bodentemperaturfühler muss an die beiden mit NTC markierten Klemmen angeschlossen werden (die Polaritat spielt keine Rolle). Wichtig! Ist die Installationsstrecke kürzer als die Sensor-Anschlussleitung (werksseitig 3m), so ist das Sensorkabel entsprechend zu kürzen. • Die Versorgungsspannung (230 V AC) wird an die Klemmen N und L angelegt, wobei die Phase an die Klemme L und der Neutralleiter an die Klemme N angeschlossen wird. • Die Anschlussleitung von Heizkreis...
Ouvrir le catalogue en page 3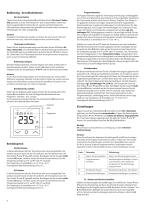
Bedienung - Grundfunktionen Ein-/Ausschalten Tippen Sie auf den Homebutton O und halten Sie ihn für etwa 3 Sekun-den gedrückt, um das Thermostat ein- bzw. auszuschalten. Wenn das Gerat ausgeschaltet (im Stand-by) ist, werden auf dem Display die Informationen entsprechend der getroffenen Auswahl in den erweiteren Einstellungen F4, Code 16 angezeigt. Hinweis: Bei jedem Einschalten des Gerdtes erscheinen für einen kurzen Moment sdmtliche Icons (vgl. Übersicht Displaystruktur) auf dem Display. Tastensperre aktivieren Gehen Sie zur Displayhauptanzeige und drücken Sie den ^ Button für etwa 3 Sekunden,...
Ouvrir le catalogue en page 4
F2 - Programmmodus einstellen Hinweis: Sie können aus zwei verschiedenen Wochenprofilen wählen, vgl. erweitere Einstellungen F4, Code 05. Entweder 5 - 1 - 1 = Mo. bis Fr. - Sa. - So., oder 7 = wochentagsindividuell, Mo. - Di. - Mi. - Do. - Fr. - Sa. - So. Wählen Sie F2 und tippen Sie auf o. Wählen Sie mithilfe der Tasten ˄ und ˅den Wochentag und den Zeitraum (Ereignis). Tippen Sie auf o. Legen Sie nun mithilfe der Tasten ˄ und ˅zuerst die Uhrzeit fest und bestätigen Sie die Eingabe mit o. Legen Sie mithilfe der Tasten ˄ und ˅als nächstes die Temperatur fest und bestätigen Sie die Eingabe mit...
Ouvrir le catalogue en page 5
Technische Daten Alarmhinweise und Fehlerbehebung Fehlercode Wichtig! Arbeiten am Thermostat, den externen Bodentemperaturfühler einge-schlossen, dürfen ausschlie&lich von einer qualifizierten Fachkraft durchgeführt werden. Der elektrische Anschluss und derAnschluss an die Stromversorgung dürfen ausschlie&lich von einerElektrofachkraft durchgeführt werden, ebenso wie das Trennen des Gerdtes von der Stromversorgung. Schalten Sie Ihr lokales Stromnetz spannungsfrei, bevor Sie den Thermostat installieren oder bevor Sie ihn von der Stromversorgung trennen, um das Gerat bzw. den externen Bodentemperaturfühler...
Ouvrir le catalogue en page 7
Garantieschein Ausgefüllter Garantieschein/Prüfprotokoll ist Grundlage für Garantieanspruch. (Typ-Bezeichnung, Artikelnummer) KUNDE Name ____________________________________________ Telefon__________________________________________ Straße____________________________________________ E-Mail ___________________________________________ Postleitzahl, Stadt __________________________________ Land _____________________________________________ Unterschrift Kunde_________________________________ INSTALLATEUR Name ____________________________________________ Telefon__________________________________________...
Ouvrir le catalogue en page 8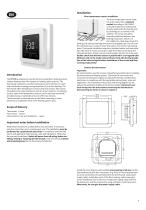
Introduction The TP 750 is designed to control electrical underfloor heating systems indoors (heating mats, film heaters or heating cable sections). The thermostat maintains a comfort temperature set for the floor or room and contributes to energy-saving operation of your floor heating. The thermostat offers temperature control using two sensors: floor sensor (included in the scope of delivery) and air sensor (built-in). For heating control, either both temperature sensors can be selected (activated) simultaneously, or optionally only one of the two sensors. The thermostat is mounted onto a wall...
Ouvrir le catalogue en page 9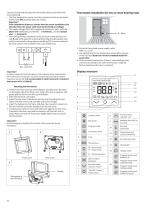
Connect all required wiring to the thermostat using its terminais with screw fastening. • The floor temperature sensor must be connected to the two terminais marked with NTC (polarity does not matter). Important! If the installation distance is shorter than the sensor installation wire (standard3m), the sensor cable must be shortened accordingly. • The supply voltage (230 V AC) is applied to terminal N and L, with the phase wire (detected by voltmeter) - to terminal L, and the neutral wire - to terminal N. • The heating element installation wires are to be connected to terminais N load and L...
Ouvrir le catalogue en page 10
Operation - basic functions Switching ON/OFF Tap the home button O and keep pressed for about 3 seconds to switch the thermostat on or off. When the device is switched off (stand-by), the display shows the information according to what has been selected in advanced settings F4, code 16. Note: Each time the device is switched on, all the icons (see overview of display structure) appear on the display for a short moment. Actîvate key lock Switch to the display main screen and tap the ^ button for about 3 seconds to activate the key lock (child lock). To disable the key lock, tap the ^ button for...
Ouvrir le catalogue en page 11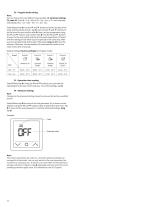
F2 - Program mode setting Note: You can choose from two different week profiles, cf. advanced settings F4j code 05. Either 5 -1 -1 = Mon to Fri - Sat - Sun, or 7 = each weekday individually, Mon - Tue - Wed - Thu - Fri - Sat - Sun. Select F2 and tap O. Use the ^ and V buttons to select the day of the week and the period (event). Tap O. Now use the ^ and V buttons to set the time first and confirm with O. Next, set the temperature using the ^ and V buttons and confirm with O. Use the ^ and V buttons to move to the next period and day of the week respectively. Proceed with the settings for all...
Ouvrir le catalogue en page 12Tous les catalogues et fiches techniques (PDF) Warm-On
 Manuel d'installation Ecotwin s
16 Pages
 Manuel d'installation EcoPro
16 Pages
 Manuel d'installation AluPro
16 Pages
 OneKeyElectro
84 Pages


- Câble chauffant
- Chauffe-fût
- Chauffe-fût industriel
- Câble chauffant pour protection antigel
- Chauffe-fût ceinture chauffante
- Câble chauffant autorégulant
- Chauffe-fût électrique
- Chauffe-fût pour fût en plastique
- Chauffe-fût d'huile
- Chauffe-fût de produits alimentaires
- Chauffe-fût pour fût métallique
- Chauffe-fût pour liquides
- Tapis chauffant
- Chauffe-fût pour produits chimiques
- Câble chauffant résistif
- Chauffe-fût pour barils
- Chauffe-fût pour peinture
- Chauffe-fût avec thermostat
- Chauffe-fût à gradient de température
- Chauffe-fût pour produits visqueux